Before I start, I want to say that I bought an Arduino with the simple idea to make domotics trough a web service so if I have the possibility I’ll post all kind of advance or development with the Arduino.
Now, If you have some experience with Arduino you must know the basic example called Blink. So, for this project is basically the same example mixed with Django and Python.
I’m gonna create a Morse device controlled from a web page, where you’ll write a message in the American Standard Code for Information Interchange(ASCII) and then the Arduino is going to write this message in Morse.
What you need to know?
- Python
- Django
- Arduino
What you need to download?
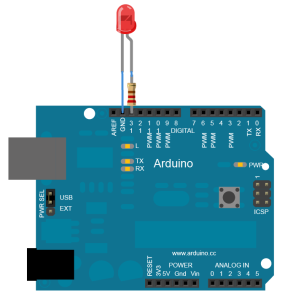
The circuit
Well, is the same as the blink example, so here is.

Step zero:
First of all, you need to install the Django and the firmata, with the Arduino software you don’t need to install anything because run with java
Django installation
$ tar xzvf Django-1.3.tar.gz
$ cd Django-1.3
$ sudo python setup.py install
Python firmata installation
$ tar xzvf lupeke-python-firmata-9826040.tar.gz
$ cd lupeke-python-firmata-9826040
$ sudo python setup.py install
Please make sure that the version of django and the firmata are the same.
First step:
After installing the Arduino IDE you must upload the firmata to your the Arduino board.
Open the arduino IDE, then select File->Examples->Firmata->Standard Firmata.
If you have problems uploading, be sure you have the right board and serial port selected under tools.
Second step:
Now is time to prepare the Django, we’re not gonna use database and we’re not gonna create any kind of model, so it makes work easier.
To create a new website we use the following command (where say WEBSITE_NAME replace with the name of your website)
$ django-admin.py startproject WEBSITE_NAME
Then we are gonna create a new app, to create a new app we use the following command (where say APP_NAME replace with the name of your app)
$ cd WEBSITE_NAME
$ python manage.py startapp APP_NAME
Additional you must create a folder with the index.html file this folder must go inside the WEBSITE_NAME folder and form.py file inside the APP_NAME folder.
$ mkdir -p template/APP_NAME/ & touch template/APP_NAME/index.html
$ touch APP_NAME/form.py
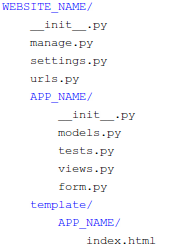
 After those steps you must have a directory like that:
Now we are gonna edit just the following files:
- settings.py
- urls.py
- form.py
- views.py
- index.html
My idea is just to explain the basic files you need to edit but you can see the full example after downloading the project.
settings.py
This file is the configuration for the Django project. We are gonna add tow lines inside TEMPLATE_DIRS and INSTALLED_APPS!
...
TEMPLATE_DIRS = (
    "/home/YOUR_USER/WEBSITE_NAME/template"
)

INSTALLED_APPS = (
    'django.contrib.auth',
    'django.contrib.contenttypes',
    ...
    'WEBSITE_NAME.APP_NAME',
)
urls.py
The URL declarations for this Django project; a «table of contents» of your Django-powered site. edit your urls.py like this
...
urlpatterns = patterns('APP_NAME.views',
    (r'^$','DEF_FUNCTION'),
)
Note: DEF_FUNCTION is a function that we are going to define in views.py file
form.py
We are gonna create a Text Field using the django API
from django import forms
class SearchForm(forms.Form):
    text = forms.CharField(max_length=500)
views.py
In the views.py file we’ll create the communication with the Arduino the logic of the Morse code and a render to response for the HTML request.
I decide to use threads in order to have a fast HTML response, while the Arduino works
from django.shortcuts import get_object_or_404, render_to_response
from django.http import HttpResponseRedirect, HttpResponse
from django.core.urlresolvers import reverse
from django.template import RequestContext
from forms import SearchForm
from arduino.arduinoMorse import ArduinoMorse
from threading import Thread
from firmata import *
a = Arduino('/dev/ttyUSB0')
a.pin_mode(13, firmata.OUTPUT)
def dot():
    a.digital_write(13, firmata.HIGH)
    a.delay(0.5)
    a.digital_write(13, firmata.LOW)
    a.delay(0.5)
def slash():
    a.digital_write(13, firmata.HIGH)
    a.delay(1.5)
    a.digital_write(13, firmata.LOW)
    a.delay(0.5)
...
class ArduinoMorse (Thread):
    def __init__(self, text):
        Thread.__init__(self)
        self.text=text
    def run(self):
            for x in self.text :
                if x=='a' or x=='A':
                    dot()
                    slash()
                    spaceL()
                ...
                ELif x=='z' or x=='Z':
                ...
def encode(request):
    if request.method == 'GET':
        form = SearchForm(request.GET)
        if form.is_valid():
            text = form.cleaned_data['text']
            arduino=ArduinoMorse(text)
            arduino.start()
        else:
            queryset = []
    form = SearchForm()
    return render_to_response("arduino/index.html", {'form': form})
index.html
The index.html file is a normal HTML file but with some syntax is from Django
<html>
    <body>
        <h1>Arduino Morse</h1>
        <form action="." method="get">
            {{ form.text }}
            <input type="submit" value="Encode" />
        </form>
    </body>
</html>
The Source Code – full project
https://github.com/alejandrok5/arduinoWEB
The source code is licensed under GPL, don’t forget to update the settings.py file.
use to run:
$ python arduinoWEB/manage.py runserver


could you please upload the file again? 🙂
okay, there it is 🙂
the download link is down
here, https://github.com/alejandrok5/arduinoWEB thanks for letting me know!